Easy Methods to Complete Your HP Printer Wireless Setup
The HP printers have become smarter than earlier due to their wireless feature. In addition to printing, you don’t need to rely on a cord or cable to connect the printer to your computer. The wireless feature has been added to many HP printers, making it easier for us to use without sticking to those wires. However, the HP printer wireless setup process is not easy for everyone, especially for beginners.
Therefore, you need
to follow the step-by-step instructions to setup your HP printer completely.
Once you finish the process, you can easily print anything at an appropriate
distance. Plus, you don’t need to place the printer near your computer because
it can print the document wirelessly. Now, follow this write-up to setup your
HP printer wirelessly. The blog explores the 4 quick and easy methods to setup
an HP wireless printer for your computer. Let’s start with the first step of
the setup procedure.
Method 1: HP Printer Wireless Setup via Auto Wireless Connect
With HP auto wireless connect, you can connect your printer to a wireless network automatically. For this method, you do not need to connect cables or enter any details such as network name or password details.
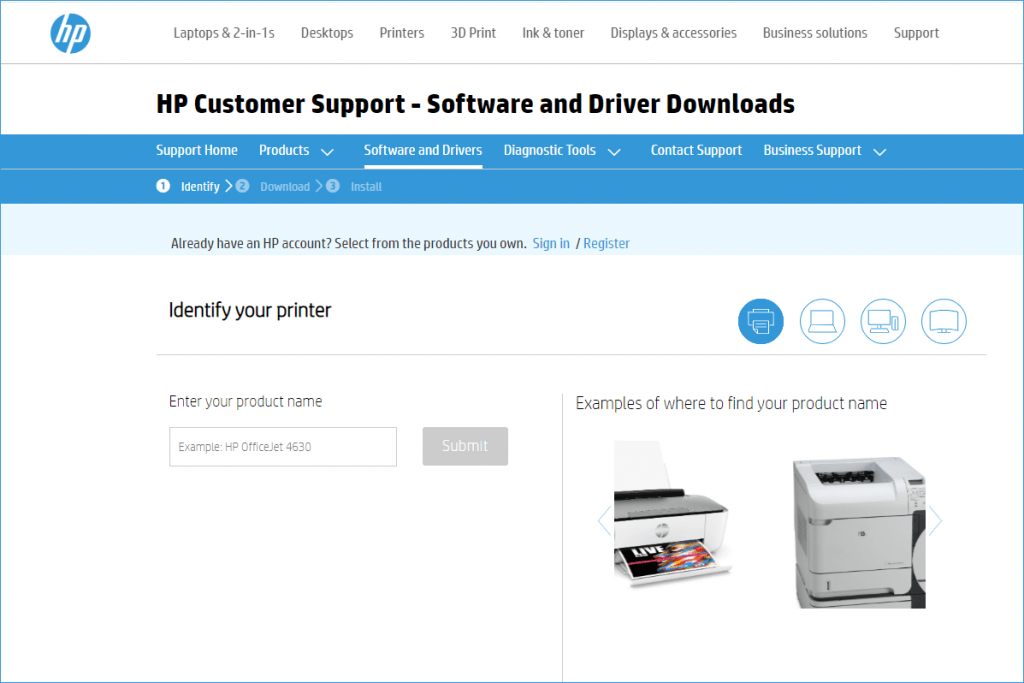
Before using this method, you first need to install the software for the printer you are using:
- Open the browser and navigate to support.hp.com.
- In the next window, you have to enter the model name or
number on the Search bar.
- Download the HP printer driver according to your operating
system.
- Then, install the on-screen instructions to install on your
PC.

- Further, turn on the printer and use the software.
- After that, you will be prompted for the Network connection type (Ethernet/Wireless).
- Then, select the Wireless and then click on Yes, send my wireless setting to the printer (recommended).
Once done, you
should wait for your printer to connect wirelessly. This may take some time.
After finishing, you can hit the Finish.
Finally, your printer is ready to go!
Method
2: HP Printer Wireless Setup Using Wireless Setup Wizard
The next method is Wireless Setup Wizard, which you can access on your printer’s control panel. This way, you can easily connect the HP printer to Wi-Fi. This method is only suitable for the HP printer having a graphics display.
- First, power on the HP printer.
- Then, unplug the USB cable or Ethernet cables from the
printer.
- Afterward, navigate to the HP printer’s Control Panel and click the Wireless icon or head to the Network menu.
- Next, select the Wireless
Settings and select the option
Wireless Setup Wizard.

- Finally, you should find the network and type the WEP or WPA key. Then, click OK.
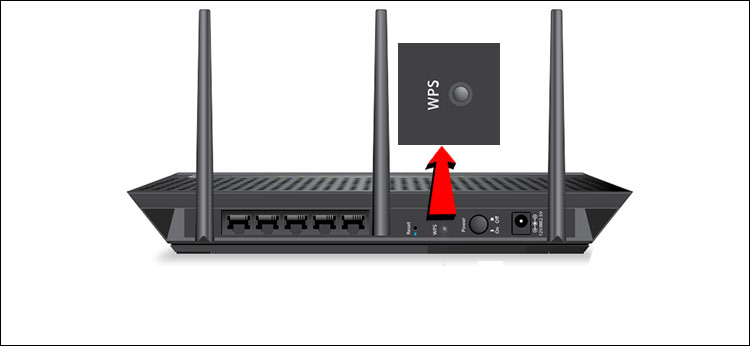
Method 3: HP Printer Wireless Setup with WPS
If you want to connect the HP printer to Wi-Fi, then your router and printer must support the WPS push button mode. The process hardly takes more than 2 minutes.
- Go to the HP printer and push the WPS button. If you can’t find the physical push button on the
printer, you can navigate to the Control
Panel to start the WPS button
mode.
- For this, you have to select the Wireless menu.
- Then, hit the Wi-Fi
Protected Setup.
- Afterward, complete the setup.
- Next, select the WPS
button.
- Finally, you will be asked to press the WPS button on the router.
- Next, keep pressing the WPS push button for 2
minutes.

That’s all you need
to connect your HP printer wirelessly.
Method
4: HP Printer Wireless Setup WI-FI Direct or HP Wireless Direct
There is little difference between Wi-Fi Direct and HP Wireless Direct, such as Wi-Fi Direct enables devices to maintain the internet connection simultaneously. In comparison, there is no access to the network in HP Wireless Direct.
Here is the way to connect to Wi-Fi Direct or HP Wireless Direct:
- Go to your HP printer’s Control Panel.
- And switch on the HP
Wireless Direct or Wi-Fi
Direct.
- Then, select the HP Wireless
Direct icon or move to the Network
Setup or Wireless Settings
menu.
- Next, select Wireless
Direct and switch on the connection.
- Further, you must connect to Wi-Fi Direct or HP
Wireless Direct from the computer or phone.
- You will be asked for a WPA2 password (only when you are using Wi-Fi Direct or HP
Wireless Direct on security.)
- Finally, you can print anything using your computer or mobile devices.
Conclusion
Finally, you have learned the HP printer wireless setup process. In
this blog, we have explained 4 different methods such as Auto Wireless Connect,
Wireless Setup Wizard, WPS, and Wi-Fi Direct or HP Wireless Direct. All these
methods can help you connect your printer wirelessly. Hence, you can easily
print your documents hassle-free from anywhere. All the techniques have been
tested, and it works perfectly. However, if you are struggling to connect, then
contact the HP support team.
FAQs
Question
1: How to setup HP wireless printer?
Answer: Here is the way to setup a wireless HP printer using the push button method of Wi-Fi Protected Setup:
- Press the Wireless button
for 3 seconds until the light
blinks.
- Within two minutes, you must push your router’s WPS button.
- After that, install the HP printer software.
- Then, start printing your documents uninterruptedly.
Question
2: How can I connect my HP Deskjet 3630 to a Wi-Fi network?
Answer: Below are the methods to connect to an HP printer via Wi-Fi Direct method:
- Switch on the printer and load the A4 size sheets.
- Then, enable the Wi-Fi
Direct by clicking on the icon.
- After that, the white light will flash.
- Further, the Wi-Fi
Direct option on the screen will appear, meaning it is activated.
- Now, enable Wi-Fi on your phone and select your HP printer,
- Enter the password (push the info button on your printer to
print the password).
- Finally, connect the printer using the HP Smart app.
Question
3: Where can I find my Wi-Fi password for my HP printer?
Answer: Connect your HP printer to an Android phone using the HP smart app to find the Wi-Fi password. Then, follow the steps mentioned below:
- Open the HP Smart
app and click the (+)
button.
- On the next screen, you will see the connected HP printer.
Click on it to proceed.
- After that, go to the
Printer Settings.
- Next, scroll down and click on the Network Information option.
- Finally, you will find the password below the Passcode option.
Visit - 123 hp printer setup
Comments
Post a Comment